Intro
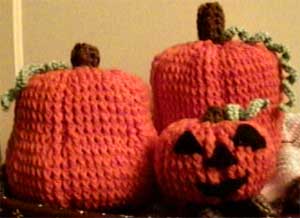 I refer to this as a recipe rather than a pattern, because I have included guidelines to adjust the pattern to create a pumpkin of nearly any size or shape you desire. The main instructions will tell you how to do a basic little pumpkin. The instructions in italics will explain how to adjust the pattern to make any kind of pumpkin you want. In the picture, the left one was made in a pear shape, and the rear right is a TP cover; changes to make these are explained below.
(I used an "I" hook with worsted weight yarn, any yarn or thread and an appropriately sized hook may be used)
You will need:
Orange yarn
Brown yarn
Green yarn
Black yarn or felt (for a Jack-O-Lantern)
Stuffing (unneeded for TP-cover, basket, or beret)
Yarn needle
Special stitches
fpdc: Front Post Double Crochet. Yarn over, insert hook around the front of the main body (post) of the dc indicated, complete as a normal dc.bpdc: Back Post Double Crochet. Work as fpdc, only inserting the hook around the back of the post of the dc indicated.
fpdc inc: Front Post Double Crochet Increase. Make two fpdc in stitch indicated.
fpdc dec: Front Post Double Crochet Decrease. (Yarn over, insert hook around the front of the post of the next dc, yarn over and pull up loop, yarn over, pull through two loops.) 2 times. Yarn over and pull through last 3 loops. It is worked as a normal dc dec, only in the post of the previous stitches rather than the tops.
Beginning and Increasing
ch4, slip stitch in first ch to make a ring.Rd 1: ch 3 [counts as first dc here and each round] dc 11 more times in the ring, sl st around starting chain to join [12 dc total].
If you want more sections on your pumpkin, add some chs to your starting chain, and then dc twice as many stitches in the ring as you want to have raised sections on the pumpkin.
Rd 2: Ch 3, fpdc in same stitch. bpdc in next stitch [each row you will do one bpdc in the bpdc of the previous row, making ridges down the sides of the pumpkin]. (fpdc inc in next st, bpdc in next st) 5 times [as many times as needed] and sl st in beginning ch 3 to join. [18 dc total]
Rd 3: Ch 3, fpdc in same stitch. Fpdc inc in next st. Bpdc in next stitch. (Fpdc inc in each of next 2 sts, bpdc in next st) 5 times [as many times as needed] and sl st in beginning ch 3 to join. [30 dc total]
Rd 4: Ch 3, fpdc in same stitch. Fpdc in next 2 sts, fpdc inc in next st. Bpdc in next st. (Fpdc inc in next st, fpdc in next 2 sts, fpdc inc in next st, bpdc in next st) 5 times [as many times as needed] and sl st in beginning ch 3 to join. [42 dc total]
Rd 5: Ch 3, fpdc in same st. Fpdc in next 4 sts, fpdc inc in next st. Bpdc in next st. (Fpdc inc in next st, fpdc in next 4 sts, fpdc inc in next st, bpdc in next st) 5 times [as many times as needed] and sl st in beginning ch 3 to join. [54 dc total]
If you want your pumpkin to be wider, keep increasing before and after the bpdcs, as before, until you get to the final width you want.
Rd 6: Ch 3, fpdc in next fpdc, and each fpdc from the previous rd, and bpdc in each bpdc from the previous round, continue around, and sl st in beginning ch 3 to join [54 dc total]
Working even
Rds 7-14: Repeat Rd 6This can be repeated until the pumpkin is as tall as you want. Also, if a pear shaped pumpkin is desired, the round can be repeated for awhile, then increases done as before, and then repeat rd 6 again.
Decreasing
Rd 15: Ch 3, 1 fpdc dec over next 2 sts. fpdc in each of next 4 sts, fpdc dec over next 2sts, bpdc in next st. (Fpdc dec over next 2sts, fpdc in next 4 sts, fpdc dec over next 2 sts, bpdc in next st) 5 times [as many times as needed] and sl st in beginning ch 3 to join. [42 dc total]Rd 16: Ch 3, 1 fpdc dec over next 2 sts, fpdc in next st, fpdc dec over next 2 sts. Bpdc in next st. (Fpdc dec over next 2 sts, fpdc in next 2 sts, fpdc dec over next 2 sts, bpdc in next st) 5 times [as many times as needed] and sl st in beginning ch 3 to join. [30 dc total]
It may be best to stuff the pumpkin at this point, or you can wait till after the next round if it's not too tight.
Rd 17: Ch 3, fpdc in next st, fpdc dec over next 2 sts, bpdc in next st. (Fpdc dec over 1st 2 sts, fpdc dec over next 2 sts, bpdc in next st.) 5 times [as many times as needed] and sl st in beginning ch 3 to join. [19 dc total]
Rd 18: Ch 3, (fpdc dec over next 2 sts, bpdc in next st) 6 times [as many times as needed] and sl st in beginning ch 3 to join. [13 dc total]
End off leaving a long tail, finish off. Thread tail through yarn needle, use it to sew the bottom shut. (I also ran it through the pumpkin from bottom to top, and back to bottom to pull it in a little to give that indentation pumpkins have on the bottom and top, but this is not necessary) finish off.
Finishing
Stem
Using brown yarn, attach with a sl st around one of the fpdc from round 2. (Chain 3, skip a fpdc and bpdc, and sl st in next fpdc.) repeat 5 times, and sl st in first chain.Rd 1: Ch 3, dc in first ch group, 2dc in each chain group around, sl st to ch 3 to join.
Rd 2: [this makes a stem with vertical ridges like a real pumpkin. If a smooth stem is desired, simply dc in each st around for rd 2.] Ch 3, bpdc in next st, (fpdc in next st, bpdc in next st) 5 times [as many times as needed] and sl st in beginning ch 3 to join.
Repeat Rd 2 as many times as desired to make the height of stem you like. End off, and use the tail to sew the end closed.